Application Development
The minimal directory structure for a WALKOFF application is as follows:
WALKOFF
+-- apps
     +-- app_name
          +-- version_number
               |-- Dockerfile
               |-- docker-compose.yml
               |-- api.yml
               +-- src
                    +-- your_code.{c, cpp, py,..., etc.}
                    +-- any other files you wish to be accessible in the app container
Full Development Instructions
If you would like to follow along by adding a VirusTotal app to your Walkoff instance, follow the EXAMPLE bullets at the end of most steps.
Watch this space for an update to the App Editor, which will allow you to create new apps fully from the UI. For now, you can only modify existing apps with it.
- 1. Write Python Functions in a Standalone Script
Start by developing your app and its functions in a standalone script outside of WALKOFF – this way you can get basic functionality down before dealing with WALKOFF.
Note: all functions that you expect to turn into actions must be written for asyncio (i.e.
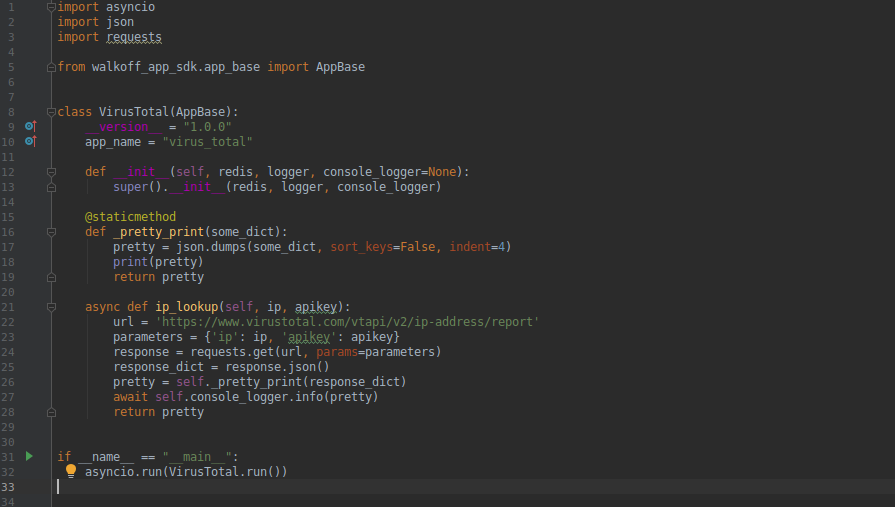
async def function_name())EXAMPLE: Below is example code that can be used to interact with VirusTotal’s Api as a standalone script
@staticmethod
def _pretty_print(some_dict):
        pretty = json.dumps(some_dict, sort_keys=False, indent=4)
        return pretty

async def ip_lookup(self, ip, apikey):
        url = 'https://www.virustotal.com/vtapi/v2/ip-address/report'
        parameters = {'ip': ip, 'apikey': apikey}
        response = requests.get(url, params=parameters)
        response_dict = response.json()
        pretty = self._pretty_print(response_dict)
        await self.logger.info(pretty)
        return pretty
- 2. Copy the hello_world application folder from the WALKOFF/apps directory
Rename the copied package to the name of your desired application
Note: The package name must be in
snake_caseand should have the same name as the app you want to create.EXAMPLE: Make sure you are in the WALKOFF/apps directory before continuing with example below.
cp -r hello_world virus_total
- 3. Copy your developed python functions into the
app.pyfile in the1.0.0/srcdirectory - Ensure that your new functions are included under the HelloWorld class declaration.
- Note: Only files under
srcwill be copied into the application’s Docker container. - EXAMPLE: Delete everything after
def __init__()but beforeif __name__ == "__main__",then paste your standalone script into the gap that has been cleared for your code. One line above the pretty print script, add@staticmethodto the same column start asdef _pretty_print. This is because_pretty_printis a helper function and we won’t define it in the api.yaml later on.
- 4. Change the HelloWorld class name in
app.pyto match the class name of your new app - Ensure that this class name matches the asyncio
__main__call at the bottom ofapp.py - Likewise, also change the app_name value to reflect your new application name
- EXAMPLE: For this step we will change the name of the HelloWorld class to VirusTotal, then below that, change the “app_name” value to be “virus_total” instead of “hello_world”. Finally at the end of the file change HelloWorld.run() to be VirusTotal.run(). By the end of all of these actions, your app.py file should look like this:
- Ensure that this class name matches the asyncio
- 5. Change the
api.yamlmetadata file to describe your app and its actions For WALKOFF to recognize a function as an action, it must have a corresponding entry in the app’s
api.yamlfileThe action names in this file must exactly match your function names in code.
You must include at least
name,app_version, andactionsin this file.- EXAMPLE:
walkoff_version: 1.0.0
app_version: 1.0.0
name: virus_total
description: Send api call to Virus Total for various actions.
contact_info:
  name: Walkoff Team
  url: https://github.com/nsacyber/walkoff
  email: walkoff@nsa.gov
license_info:
  name: Creative Commons
  url: https://github.com/nsacyber/WALKOFF/blob/master/LICENSE.md
actions:
  - name: ip_lookup
    description: Look up an IP in VT database
    parameters:
      - name: apikey
        schema:
          type: string
        required: true
        description: enter api key
      - name: ip
        schema:
          type: string
        required: true
        description: enter ip address
    returns:
      schema:
        type: string
- 6. Change the
requirements.txtto match your applications needs - This file should include any Python package dependencies your app contains
- The Dockerfile will use this to pip install dependencies
- EXAMPLE:
requests- 7. Edit
docker-stack-windows.yml(Windows only) - At the current time, the WALKOFF “Bootloader” for Windows is rather basic due to time constraints. It will be brought up to the same functionality as the Linux version once time allows.
- Copy an existing app service definition and change the service name to match your app’s directory name.
- Note: If you want directories on your host to be available in the container, you can add volume mounts here.
- EXAMPLE:
services:
  <other service definitions>
    app_virus_total:
      build:
        context: apps/walk_off/1.0.0
        dockerfile: Dockerfile
      configs:
      - common_env.yml
      deploy:
        mode: replicated
        replicas: 0
        restart_policy:
          condition: none
      image: 127.0.0.1:5000/walkoff_app_virus_total:1.0.0
- Optional:
DockerfileCustomization This will control how your app will be built.
See
hello_world’s Dockerfilefor a detailed, step-by-step example on how to create your ownDockerfileIf your application’s Python dependencies require any OS libraries to build, or if your application requires any OS packages to run, include them in this file.
You can test building your app with the Dockerfile before running it in WALKOFF:
docker build -f apps/app_name/1.0.0/Dockerfile apps/app_name/1.0.0EXAMPLE: We won’t be doing anything here.
Updating Your Application
To edit an existing application, navigate to the App Editor in WALKOFF. Using this UI, you can edit existing apps, add new files, and build app images.
Let’s add a new action to the hello_world app.
1. Open src/app.py and start by copying an existing action
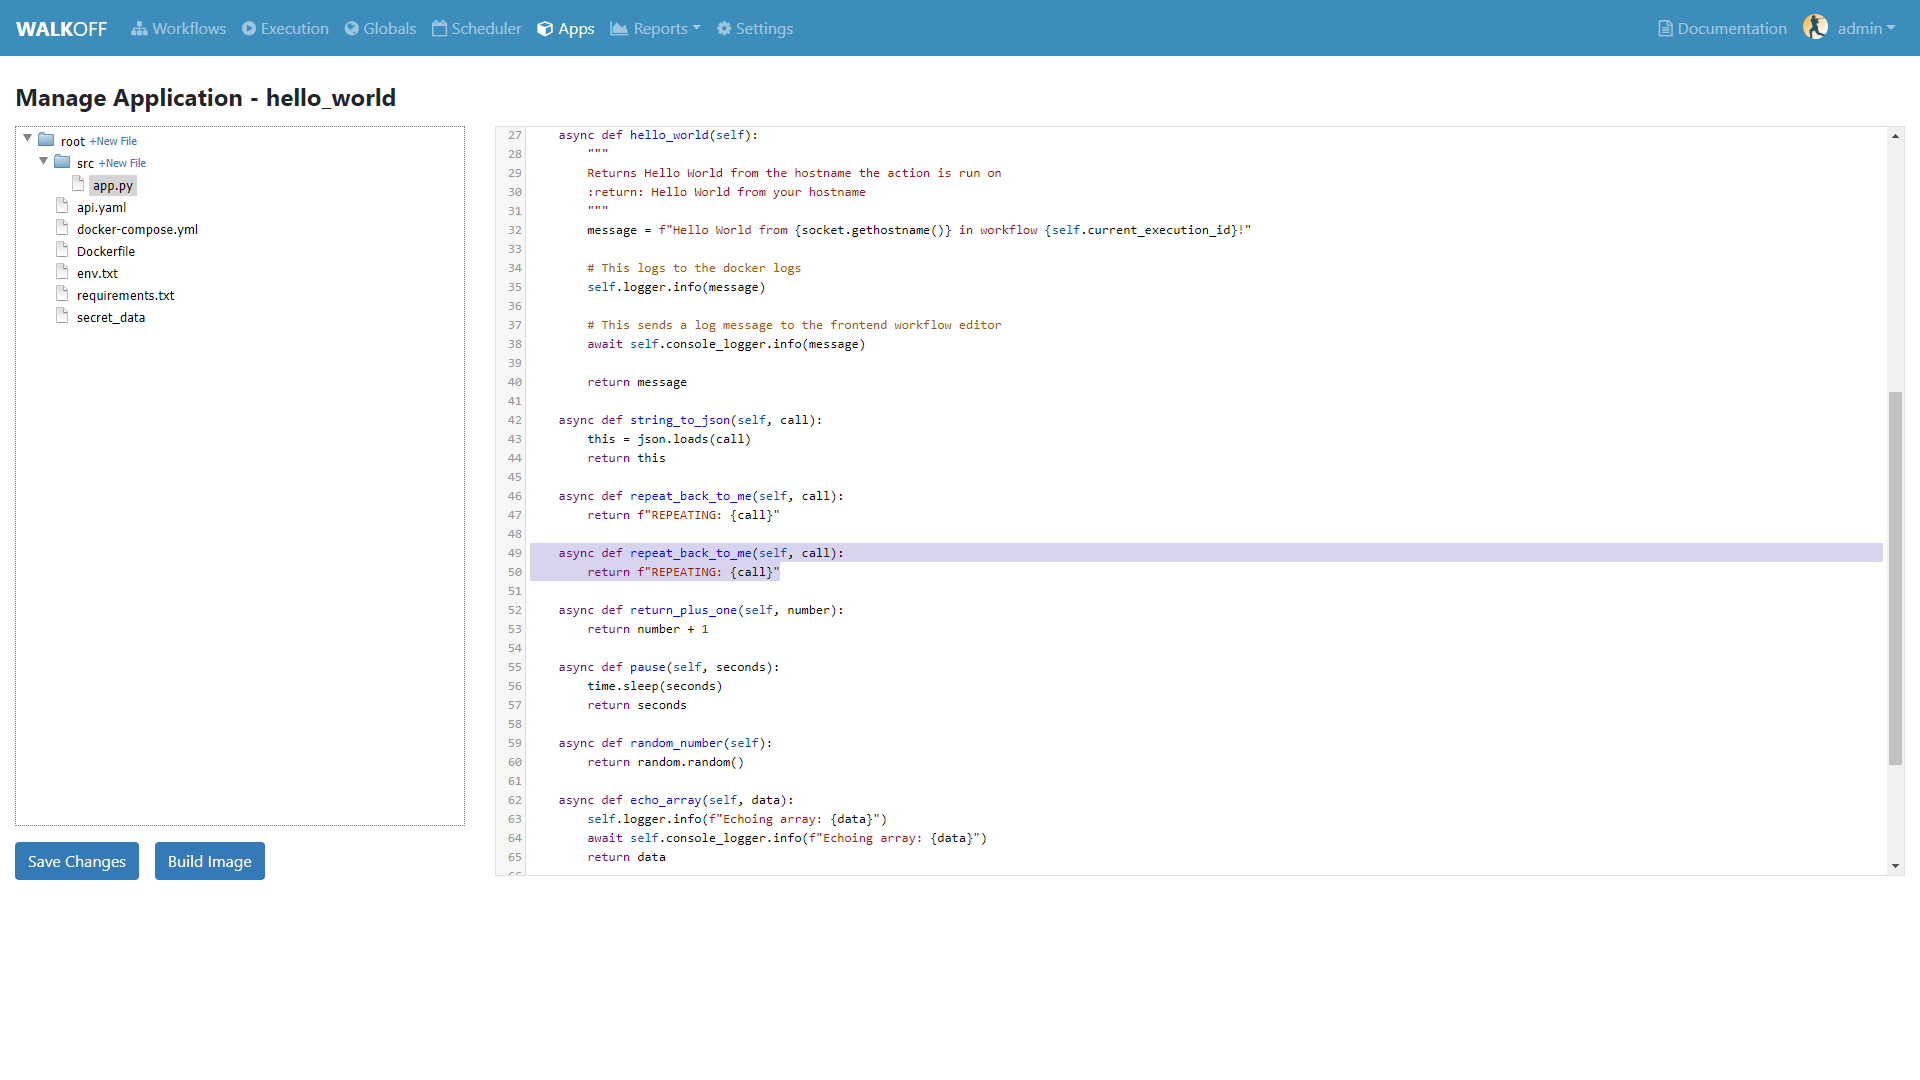
2. Edit the action as desired and save changes
If you need to add binary dependencies, add it to the Dockerfile. If you need to import new Python modules, be sure to add them to
requirements.txt. If you need to read files, be sure to place them insidesrcto make them usable inside the app container.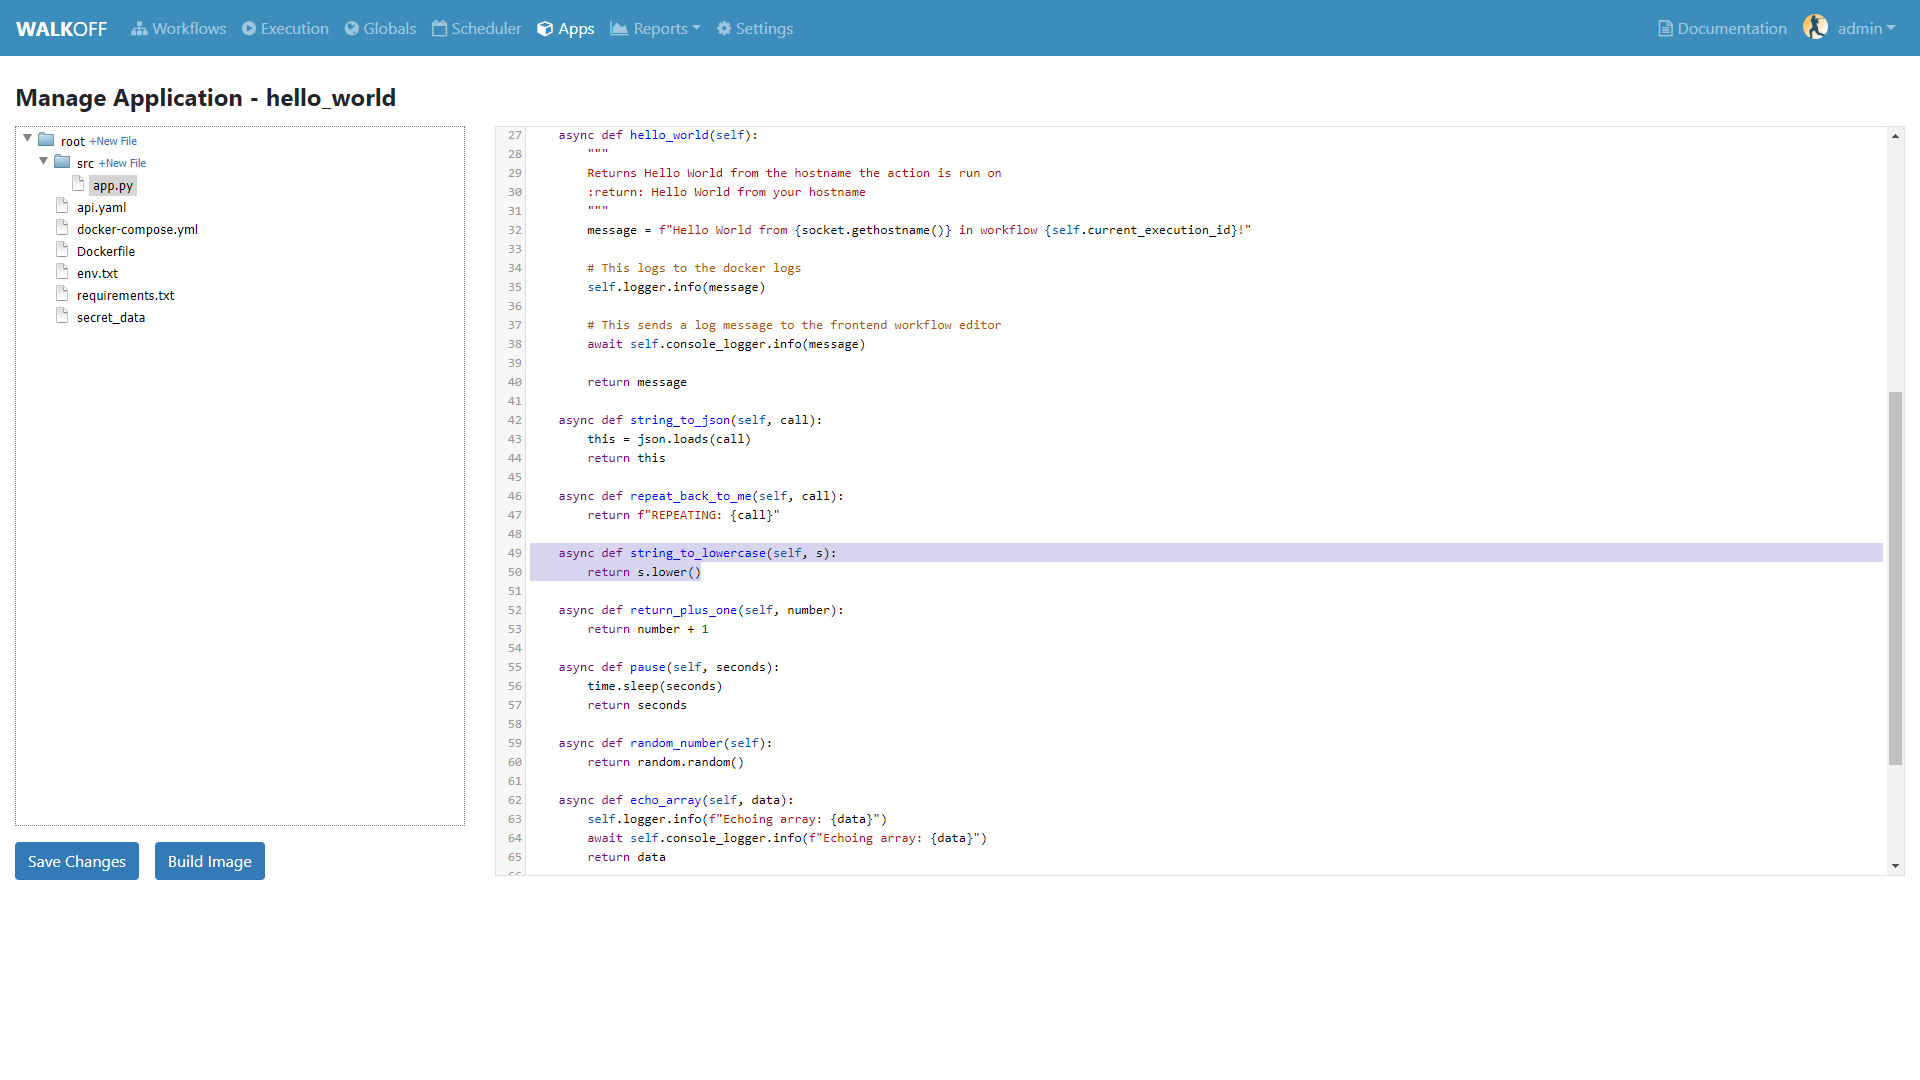
3. Open api.yaml and start by copying an existing action
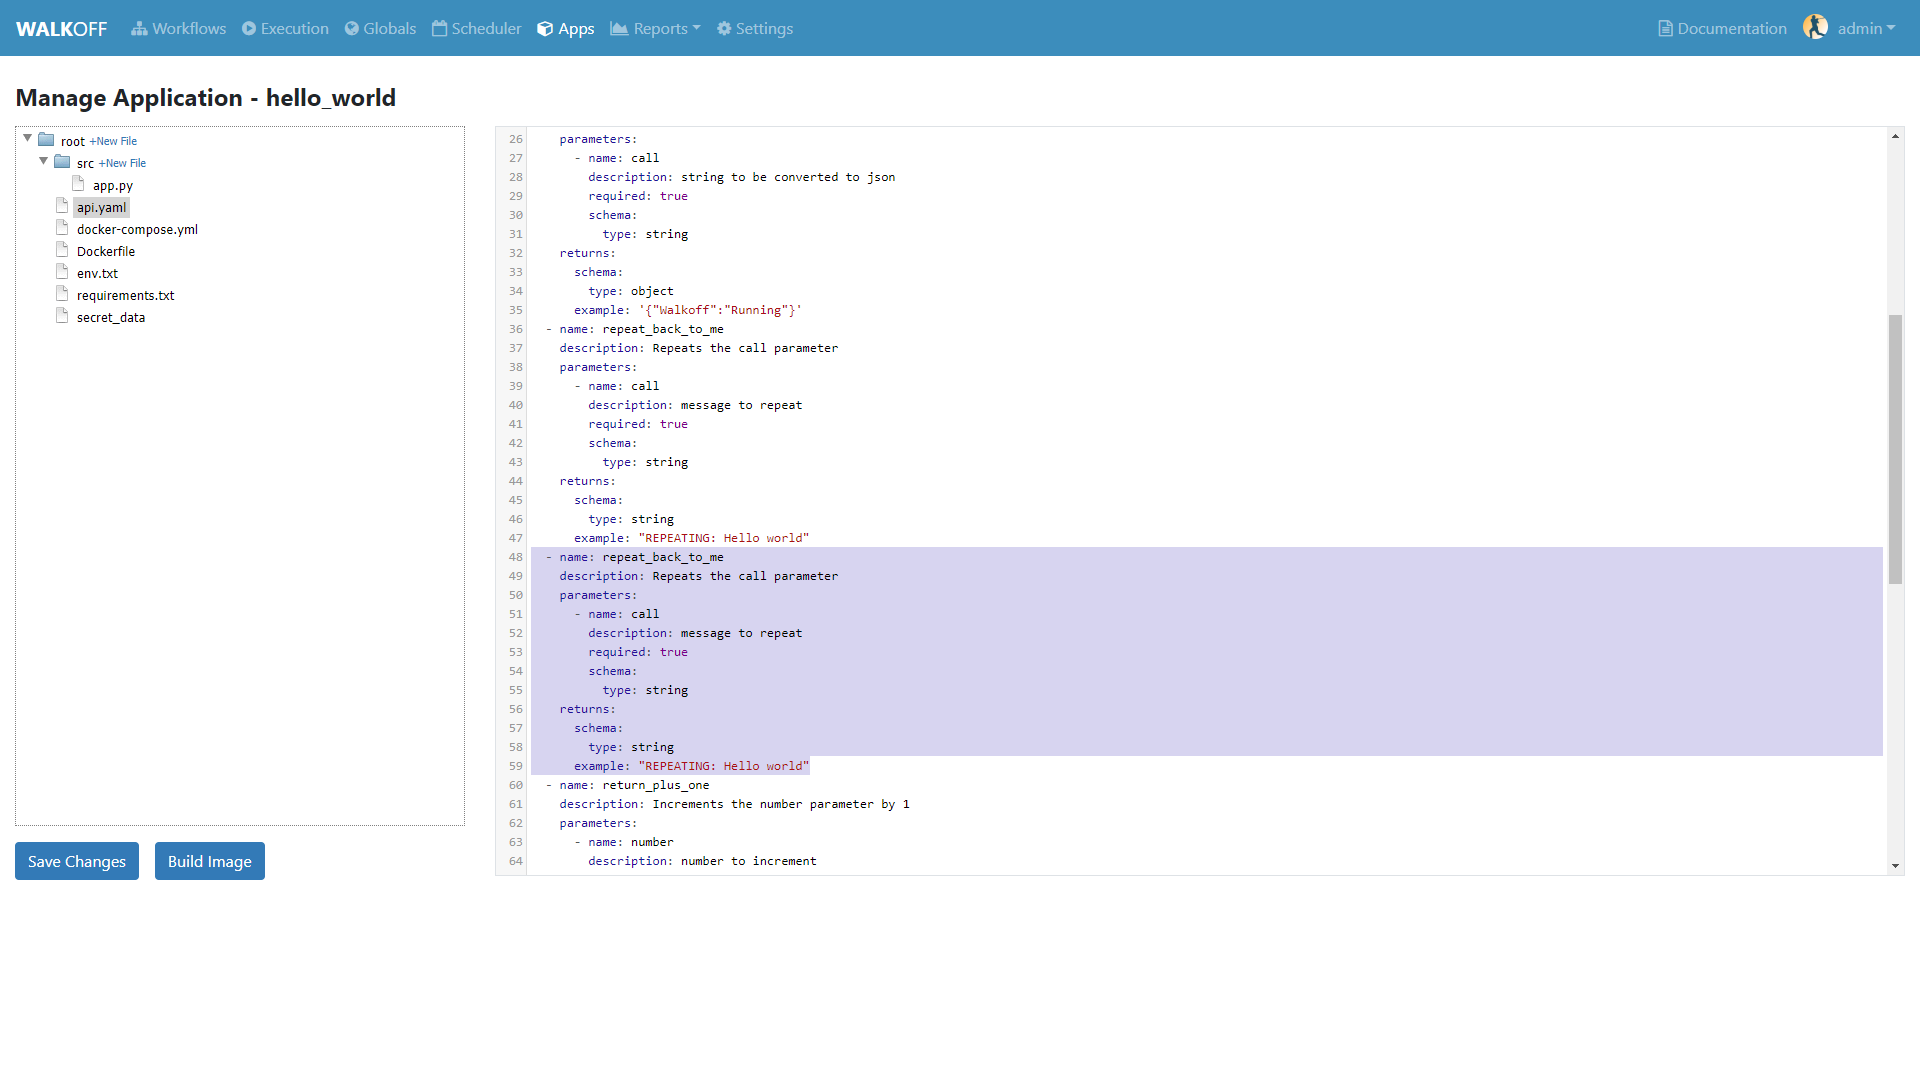
4. Edit the action as desired and save changes
Any time you see the
schemakey, you can use JSON Schema to specify how the parameter or return value should look like. A full schema for what is permissible can be found here.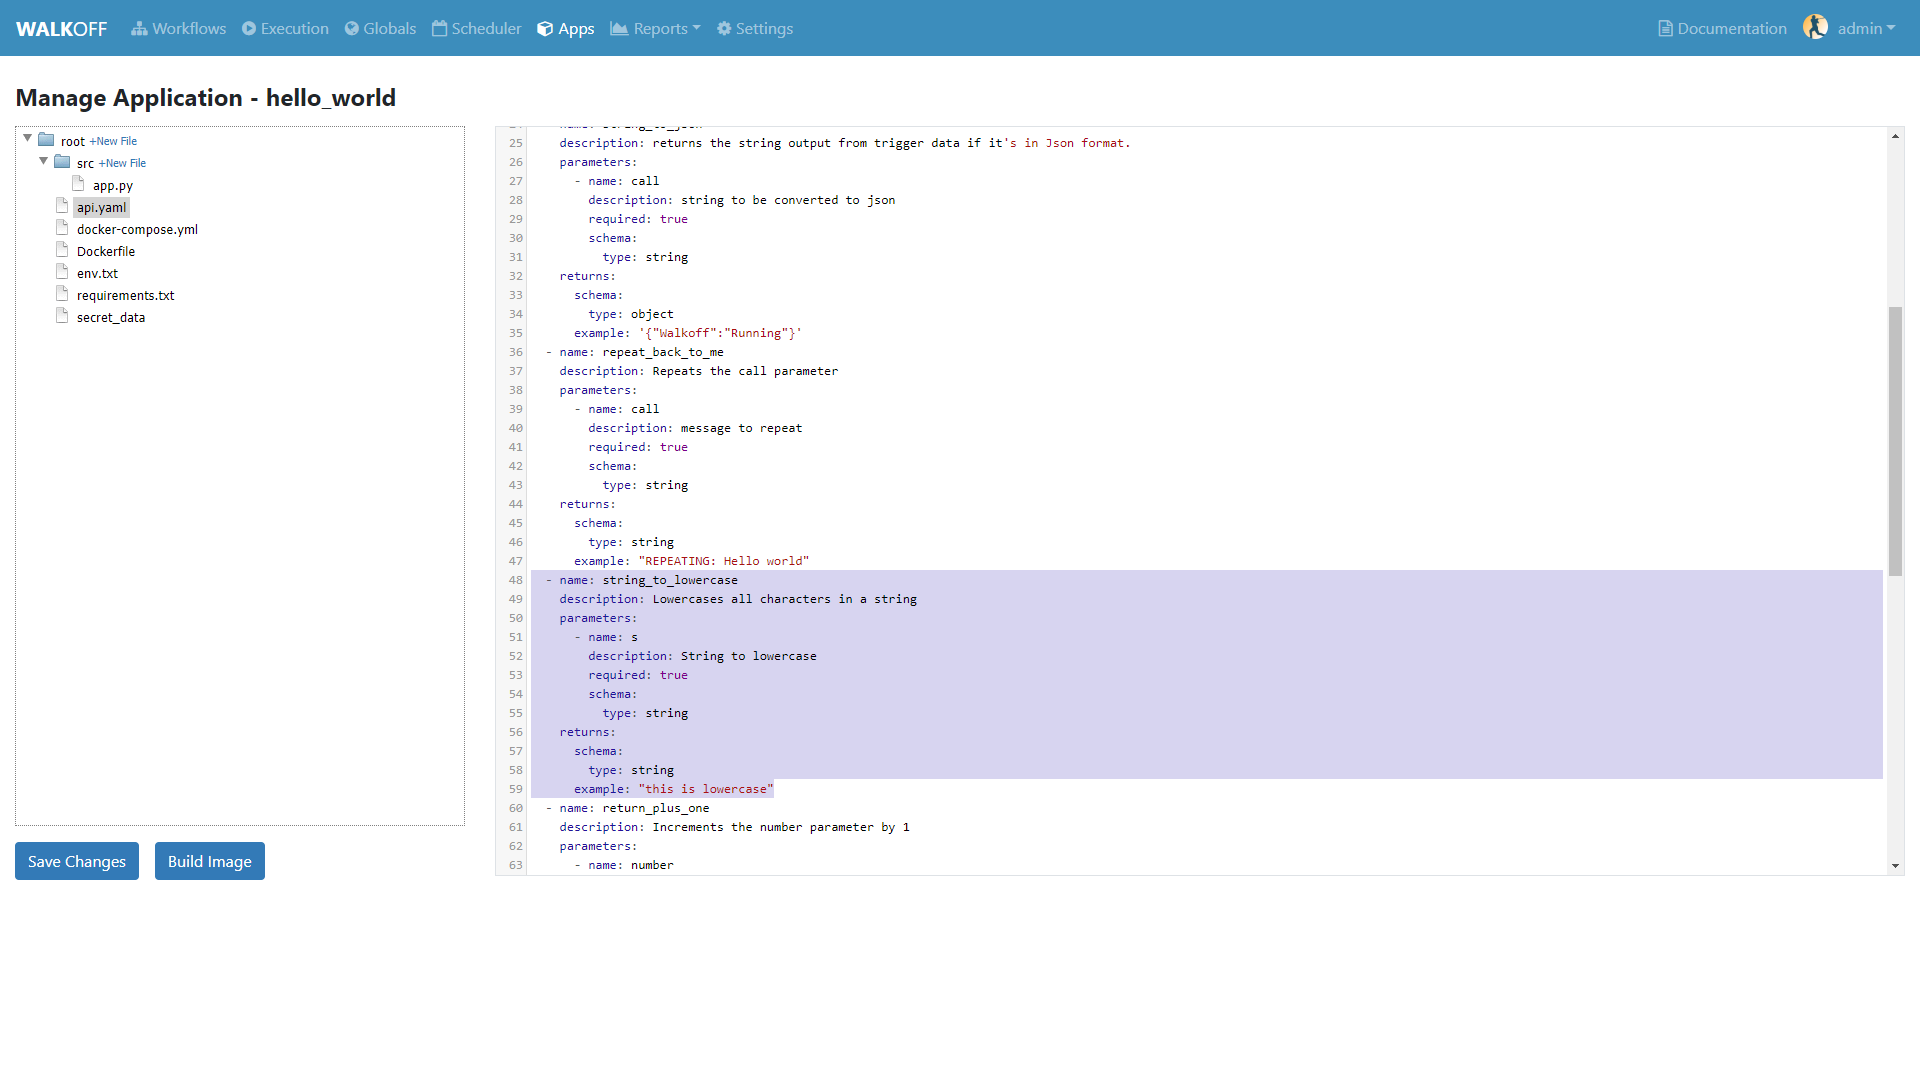
5. Build the image and watch the build logs
You can watch the Umpire logs to view build status:
docker service logs -f walkoff_core_umpire`The output will look something like this:
Umpire - INFO:Sending image to be built
Umpire - INFO:Docker image building
UMPIRE - DEBUG:Step 1/11 : FROM 127.0.0.1:5000/walkoff_app_sdk as base
UMPIRE - DEBUG:Pulling from walkoff_app_sdk
UMPIRE - DEBUG:Digest: sha256:76c9c7c3d16697d0edd4a3dffb9591c69cff0c6fdf1ca87e092a0f7cbeee34ab
UMPIRE - DEBUG:Status: Image is up to date for 127.0.0.1:5000/walkoff_app_sdk:latest
UMPIRE - DEBUG:---> 279ce0973000
UMPIRE - DEBUG:Step 2/11 : FROM base as builder
UMPIRE - DEBUG:---> 279ce0973000
UMPIRE - DEBUG:Step 3/11 : RUN mkdir /install
UMPIRE - DEBUG:---> Using cache
UMPIRE - DEBUG:---> dd8c3a031946
UMPIRE - DEBUG:Step 4/11 : WORKDIR /install
UMPIRE - DEBUG:---> Using cache
UMPIRE - DEBUG:---> fe17dbbc4e04
UMPIRE - DEBUG:Step 5/11 : COPY requirements.txt /requirements.txt
UMPIRE - DEBUG:---> Using cache
UMPIRE - DEBUG:---> 31e89590b9d4
UMPIRE - DEBUG:Step 6/11 : RUN pip install --no-warn-script-location --prefix="/install" -r /requirements.txt
UMPIRE - DEBUG:---> Using cache
UMPIRE - DEBUG:---> ca768328609e
UMPIRE - DEBUG:Step 7/11 : FROM base
UMPIRE - DEBUG:---> 279ce0973000
UMPIRE - DEBUG:Step 8/11 : COPY --from=builder /install /usr/local
UMPIRE - DEBUG:---> Using cache
UMPIRE - DEBUG:---> 30fd3018eff0
UMPIRE - DEBUG:Step 9/11 : COPY src /app
UMPIRE - DEBUG:---> cb20500dbc0b
UMPIRE - DEBUG:Step 10/11 : WORKDIR /app
UMPIRE - DEBUG:---> Running in 98e4322863b3
UMPIRE - DEBUG:Removing intermediate container 98e4322863b3
UMPIRE - DEBUG:---> b50497e91a92
UMPIRE - DEBUG:Step 11/11 : CMD python app.py --log-level DEBUG
UMPIRE - DEBUG:---> Running in 1f97d270877f
UMPIRE - DEBUG:Removing intermediate container 1f97d270877f
UMPIRE - DEBUG:---> ae238196c4e6
UMPIRE - DEBUG:Successfully built ae238196c4e6
UMPIRE - DEBUG:Successfully tagged 127.0.0.1:5000/walkoff_app_hello_world:1.0.0
Umpire - INFO:Docker image Built
Umpire - INFO:Pushing image 127.0.0.1:5000/walkoff_app_hello_world:1.0.0.
Umpire - INFO:Pushed image 127.0.0.1:5000/walkoff_app_hello_world:1.0.0.
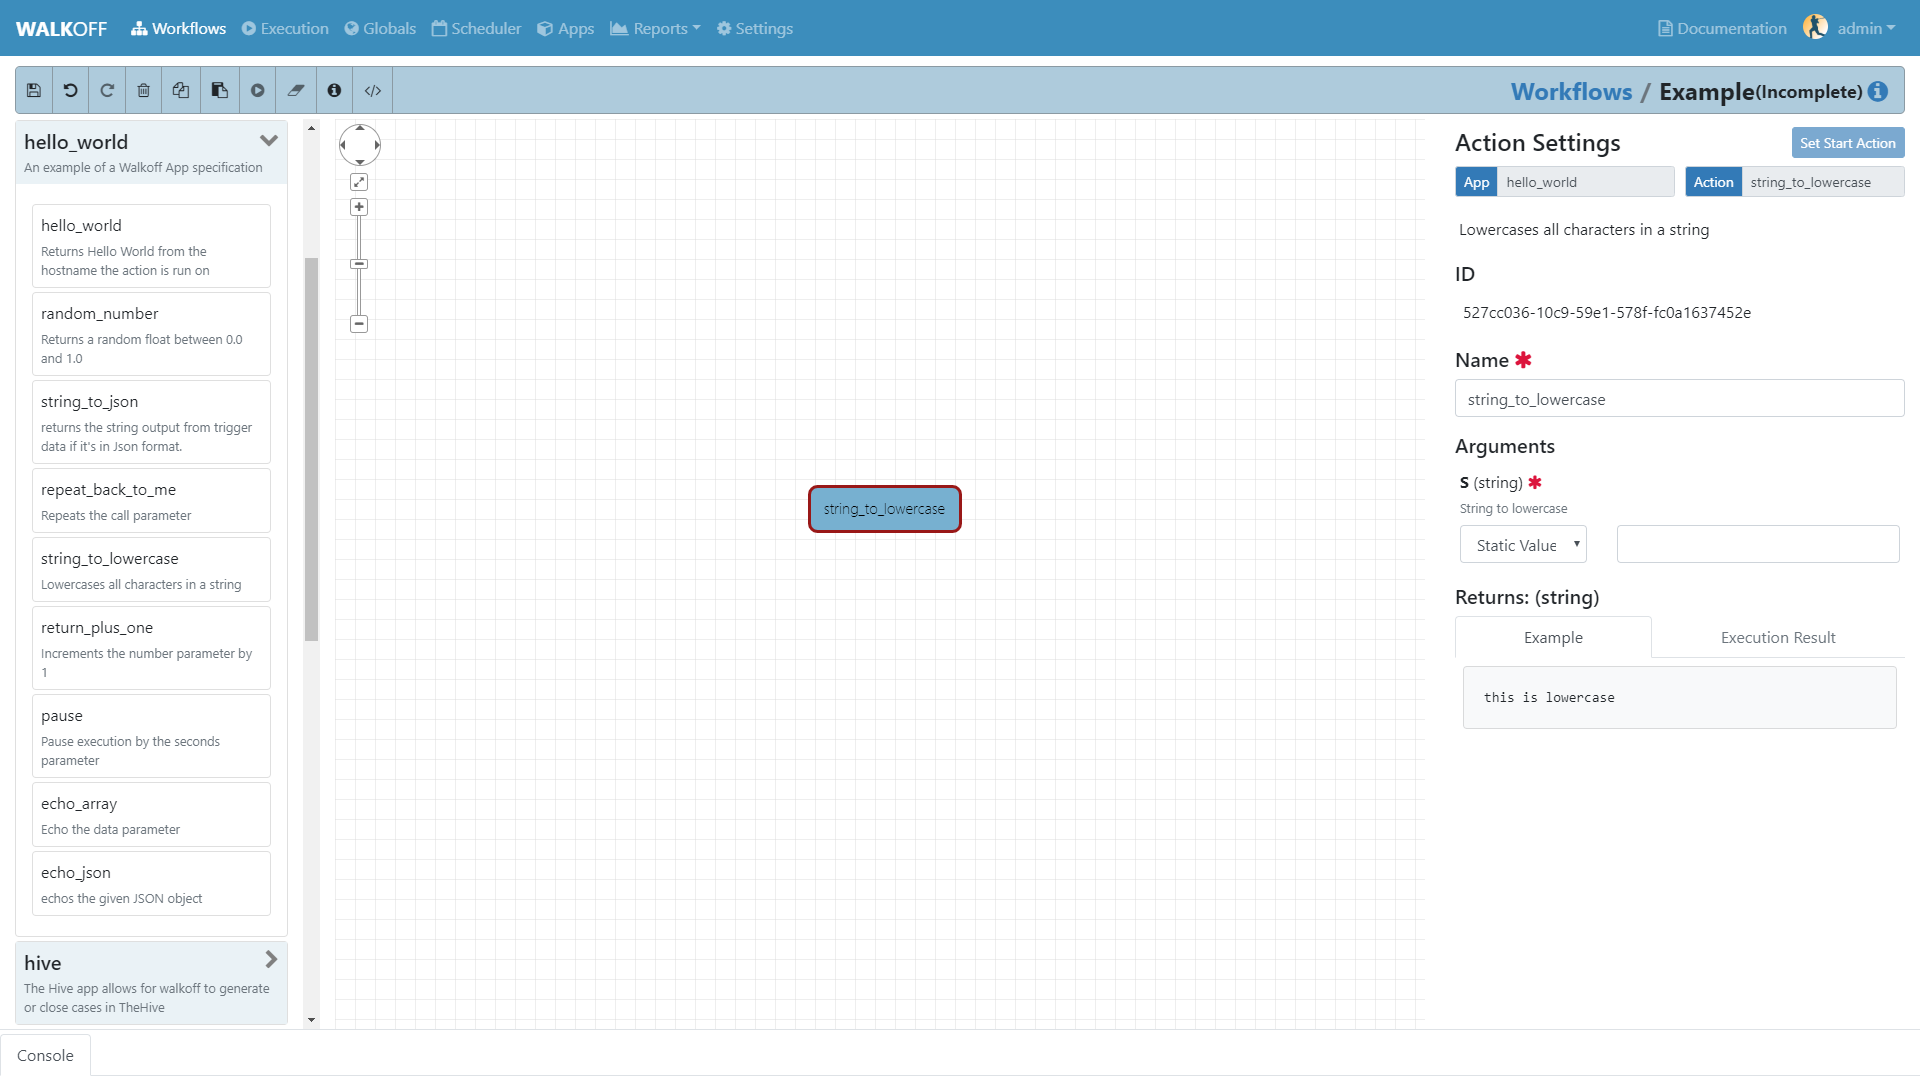
6. Try out your new action in the workflow editor.
Naming and String Requirements:
- App name must be
snake_caseand match in all the following locations:
- app directory
- app_name in
app.py- app_name in
api.yaml- service name in
docker-compose.yml- Your action names in
api.yamlmust match the function names they correspond to inapp.py- If your script is not named
app.py, the new name must match the command at the end of yourDockerfile
Troubleshooting
There are several key places to look to debug an application, navigate to Portainer located in the settings tab and go through the setup process if you haven’t done so already. This will help you with the following steps for debugging:
Umpire
Following the umpire’s logs (docker service logs -f walkoff_umpireor clicking on the containers tab in portainer and then clicking on the logs icon next to walkoff_core_umpire) can give you an indication of whether build issues are happening within the stack. Building an app for the very first time can take a long time for example if it contains C dependencies that need to be compiled.Docker Services
Watching docker services (watch -n 0.5 docker service lsor select the services tab on the left panel) can give you an indication of whether your app is running or crashing. At idle with no work, apps and workers will scale to 0/N replicas. If you see something repeatedly scaling up and back down to 0, it may be crashing.Worker Service Logs
Checking the worker service log after the service becomes available for the first time (docker service logs -f workeror clicking on the containers tab in portainer and then clicking on the logs icon next to walkoff_core_worker) will allow you to view the worker logs. Generally apps will not cause problems here, but there may be edge cases missing in scheduling apps.App Service Logs
Checking the app service log after the service becomes available for the first time (docker service logs -f walkoff_app_app_nameor clicking on the services tab then the assocaited app followed byservice logs) will allow you to view the stdout of your app, as well as any exceptions it might be raising.Console Logging
If you are more familiar with print debugging, you can add information to the console logger by following the code below. This will display the console output in the workflow editor page under the tabConsole.message = "This is to be printed to the console logger" await self.logger.info(message)
App Containers
- Obtain app_container_name from docker ps.
- You can docker exec -it app_container_name /bin/sh into your app container while it is running to check things like network connectivity, the filesystem, or to run your app manually inside it. (If it is crashing on startup, you will need to fix that first or override its starting command with a sleep instead)
You can also run the app manually outside of docker entirely. Keep in mind while running your app this way, you will have access to your host’s filesystem in a way that is not normally accessible to app containers.
Install the WALKOFF App SDK (assuming you’re starting from WALKOFF’s directory)
cd app_sdk
pip install -e .
Add debug flags to the umpire’s service definition in
docker-compose.ymlumpire: command: python -m umpire.umpire --log-level=debug --disable-app-autoheal --disable-app-autoscale image: localhost:5000/umpire:latest build: context: ./ dockerfile: umpire/Dockerfile networks: - walkoff_default <...>Run the rest of WALKOFF via docker-compose as described in the main Readme
cd ..
docker stack deploy --compose-file=docker-compose.yml walkoff
Export environment variables that the app would normally expect inside its container, but change service names to localhost
export REDIS_URI=redis://localhost
export REDIS_ACTION_RESULT_CH=action-results
export REDIS_ACTION_RESULTS_GROUP=action-results-group
export APP_NAME=hello_world
export HOSTNAME=$(hostname)
export PYTHONPATH="${PYTHONPATH}:$(pwd)"
Navigate to and run your app.py. The app will exit if no work is found, so ensure you run your app just after executing the workflow.
python apps/hello_world/1.0.0/src/app.py